
Many years ago I purchased a pair of Cerwin Vega D5e speakers for the money I got in present for my confirmation party (15 years old). I had these speakers through my teens up until I was on technical university where I build a new pair of speakers. They served through many parties, running uff my NAD 2020. Really efficient speakers capable for playing really loud in modest rooms with the only 20 watt of power. Amazing 🙂
I sold the speakers long ago … to get only a modest amount of cash … why 🙁 ….. Now some 30 years later my, girls are turning 17 and we need a soundbox. We could of course just go out and buy one, but what is the fun in that. Why not start yet another project (hope I finish this one 😉 ), using some of by class-d amps and some decent speaker units. I’m planning on a 2 way unit, capable of sub 40 Hz without DSP (though will probably add DSP just to handle x-over and frequency response).
So have been looking a suitable drivers, but today most drivers, not least pro drivers are meant to be driven with a lot of power, and therefore the T/S parameters are designed for this, enabling lower bass, and higher overall output. In the older days PA drivers where optimized for efficiency, and so where Cerwin Vega. I’m hoping that this driver will work well in a 50 liter vented box and have a sensivity around 96 db, while having a -3 db point below 40 Hz. This would be ideal for a soundbox. The problem or challenge with a soundbox is that it needs to work from a rather small battery, and have to work for may hours without the need for charging. Therefore efficiency is everything!
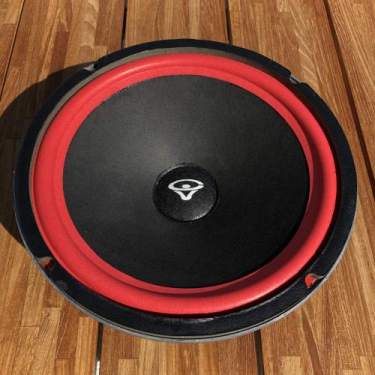
I was lucky to find an old CV 12 inch driver which needed a new foam surround. only 125 dkk / 16,5 € for the driver. It’s a 1121-4 same as the one used in my old D5-e’s, so what is not to like 🙂 ….. the seller had already removed the old foam .. these simply crumple over time and need renewing, so it was missing it’s red surround the trade mark of almost all CV woofers, and generally looked a bit sad.

A new surround was ordered from Audiofrinds in the Netherlands. 27,5 € including glue and postage to DK …. more then the unit, but hopefully worth it. Have used Audiofriends before, a decent, fast and reliable
seller.
I have decided to cut the dustcap. Audiofriends do not have new with the CV logo … and we need that of course, and getting one from US is unbelievable expensive, so have just cut the old one and plan on re-using it again. Why take it off? … well a driver this size and with a quite flexible spider, is quite wobbly and need to be centered to make sure the voice coil will not rub after the new surround is mounted. Have heard about units refoamed by “professionals” which was rubbing and making noise after repair …. so I want to make sure this does not happen.


As the old driver looked a bit unhappy and whethered, with a faded cone, I decided to refresh it a bit with some color. This will also help weatherproof it a bit adding a thin layer of paint. I used a normal black spray paint for the cone (mat finish), and a clear cote for the dust cap on both sides, and also the clear cote on the backside of the cone.
It for sure looks better, and the cone actually feels more stiff. It will of course add a little weight to the unit, costing a little on efficiency and lovering the fs, but if it is going to be used outside, I sor sure think it is needed. And again .. it looks good 🙂


I made some shims to put into the gap between the center-pole and the coil-former, to make it center. Just made of some pieces of plastic.
Glue on the back of the foam surround (it is gray on the backside and red on the front for CV), and then gently pressing it to the cone … takes around 10 minutes before ti really sticks.
Let it cure and then glue the outer rim to the basket …. this was a little difficult as it sort of wanted to slip up at an angle and was therefore not easy to get to stick. Took some time but got it right.


Removed the shims, and put a little Bostik blue tacky wax on the dust cap so I could maneuver it in to place. Glue on the inside, placed the dust cap and then glue on the outside. Put a bit of weight on for it to sit and cure.
Last thing was to glue the gasket back on.
The result …… Well if that isn’t looking nice 🙂 …. as good as new 🙂

First measurements of Thiele-Small parameters:

Used the added weight method and measured the piston diameter to 26 cm (from mid surround to mid surround).
Sensitivity is a little disappointing around 93 db, and even with the new and still stif surround Vas is up at more than 150 liter. …. will require quite a big box … but not that surprising … CV is not known for small boxes 😉
Will have to let it play some 15-20 Hz note with good excursion for some hours before next measurement. Expect Fs to decrease and Vas to increase. Will this have an effect on the box design or the sound … not much I think as the parameters are “moving in opposite direction”. See here for someone who did the test.
Using a 70 liter vented box with a port tuning for 30 Hz gives an -3 db point around 44 Hz … ok but not really great…. (150 liter would give a -3db point of 30 Hz) …. will try to do some burn in and see if it helps 😉
